# Getting Started
TIP
To read this tutorial, developers need to have knowledge of vue (opens new window) and element-ui (opens new window)
# Debugging front-end code
Debugging front-end code is unbearable if we compile it every time we modify it and upload it to the device.
Webpack provides hot update technology. We can make every change displaied on our browser immediately.
1.Install nodejs (opens new window)(8.11.0+). You can manage multiple versions of Node on the same machine with nvm (opens new window) or nvm-windows (opens new window)
2.Clone the vuci code to any location on your development host machine.
git clone https://github.com/janenas-luk/vuci.git
3.Enter:vuci/vuci-ui-core/src/
cd vuci/vuci-ui-core/src/
4.Modify the proxy configuration: replace openwrt.lan in vue.config.js with the IP address of your device.
module.exports = {
  indexPath: 'vuci.html',
  productionSourceMap: false,
  devServer: {
    proxy: {
      '/ubus': {
        target: 'http://openwrt.lan'
      },
      '/cgi-bin/': {
        target: 'http://openwrt.lan'
      }
    }
  }
  ...
}
5.Install dependency packages
npm install
6.Start the Debugging Server
npm run serve
7.According to the output prompt, access the debugging server in the browser. At this point, your code changes will be immediately updated to the browser.
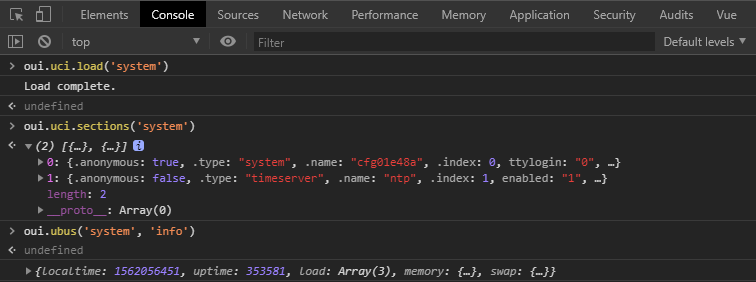
# Web Console Debugging
Webpack builds Vue code in two versions, one for the development version(the debugging described in the previous section is the development version) and the other for the production version. In the development version, vuci exported UCI and UBUS tools for debugging.
Press the F12 shortcut to open the browser's console, where we can query the UCI configuration and call ubus.
# $uci
Vuci adds the attribute $uci to the Vue instance, which provides a series of methods for manipulating uci.
Refer to the source code for specific usage:vuci/vuci-ui-core/src/src/plugins/uci.js
# $ubus
Vuci adds the attribute $ubus to the Vue instance, which provides a series of methods for call ubus.
Refer to the source code for specific usage:vuci/vuci-ui-core/src/src/plugins/ubus.js
# String.format
%t
'%t'.format(13124) === '3h 38m 44s'
%m
'%m'.format(1000) === '1.00 K'
'%M'.format(1024) === '1.00 K'
'%.3m'.format(1100) === '1.100 K'
'%mB'.format(1100) === '1.10 KB'
%d
'%d'.format(10) === '10'
'%d, %d'.format(5, 10) === '5, 10'
'%5d'.format(123) === '  123'
'%-5d'.format(123) === '123  '
'%05d'.format(123) === '00123'
%s
'This is a %s'.format('pen') === 'This is a pen'
'This is %s %s'.format('a', 'pen') === 'This is a pen'
'%5s'.format('abc') === '  abc'
'%-5s'.format('abc') === 'abc  '
%o
'123 => %o'.format(123) === '123 => 173'
'0x7b => %o'.format(0x7b) === '0x7b => 173'
%b
'123 => %b'.format(123) === '123 => 1111011'
'0x7b => %b'.format(0x7b) === '0x7b => 1111011'
%x
'123 => %x'.format(123) === '123 => 7b'
%X
'123 => %X'.format(123) === '123 => 7B'
%c
'%c'.format(97) === 'a'
'%c'.format(0x61) === 'a'
%f
'%f'.format(1.12345) === '1.12345'
'%.2f'.format(1.12345) === '1.12'
# How to add a page
# First add the navigation menu
The navigation menu configuration file storage path is:vuci-ui-core/files/usr/share/vuci/menu.d
You can add in an existing menu configuration or create a new file. Navigation menu is divided into first-level navigation menu and second-level navigation menu.
For example, create a new navigation menu configuration file:vuci-ui-core/files/usr/share/vuci/menu.d/test.json
{
  "test": {
    "title": "Test",
    "index": 90,
    "view": "test"
  }
}
- The first
testhere indicates that the navigation path of the menu istest title: Navigation menu titleindex: Used for sorting navigation menus, smaller and closer to the frontview: Vue component path corresponding to navigation menu
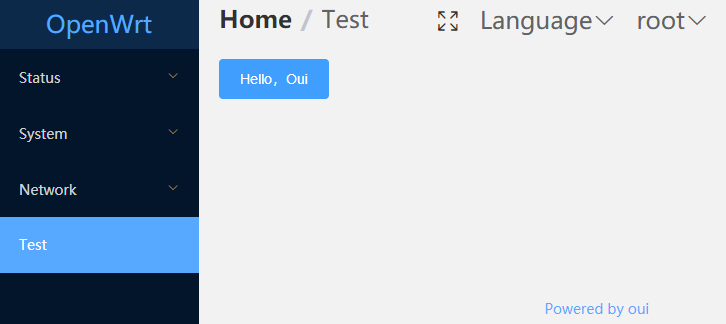
# Add pages for the navigation menu just added
Create a very simple Vue component: vuci/vuci-ui-core/src/src/views/test.vue
<template>
  <a-button type="primary">Hello,Vuci</a-button>
</template>
Recompile vuci and update it to the device. The results are as follows:
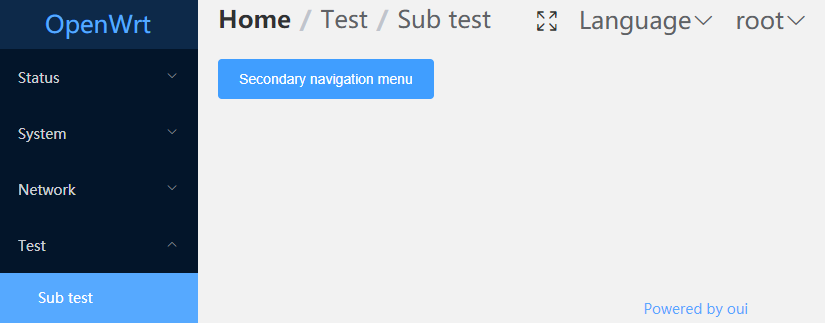
# Secondary navigation menu
{
  "test": {
    "title": "Test",
    "index": 90
  },
  "test/sub": {
    "title": "Sub test",
    "index": 1,
    "view": "test/sub"
  }
}
Delete the previously added test.Vue and add a new Vue component:vuci/vuci-ui-core/src/src/views/test/sub.vue
<template>
  <el-button type="primary">Secondary navigation menu</el-button>
</template>
Recompile vuci and update it to the device. The results are as follows:
# How to register UBUS service
All data accessed by vuci comes from the ubus service provided by the back end. So you have to register ubus for your data.
For most of the data, OpenWrt has registered UBUS services for us. If not, we need to register ourselves.
TIP
For UCI configuration files, OpenWrt's own software package rpcd (opens new window) has provided us with UBUS services to manipulate UCI configuration files.
root@OpenWrt:~# ubus -v list uci
'uci' @301dba5a
        "configs":{}
        "get":{"config":"String","section":"String","option":"String","type":"String","match":"Table","ubus_rpc_session":"String"}
        "state":{"config":"String","section":"String","option":"String","type":"String","match":"Table","ubus_rpc_session":"String"}
        "add":{"config":"String","type":"String","name":"String","values":"Table","ubus_rpc_session":"String"}
        "set":{"config":"String","section":"String","type":"String","match":"Table","values":"Table","ubus_rpc_session":"String"}
        "delete":{"config":"String","section":"String","type":"String","match":"Table","option":"String","options":"Array","ubus_rpc_session":"String"}
        "rename":{"config":"String","section":"String","option":"String","name":"String","ubus_rpc_session":"String"}
        "order":{"config":"String","sections":"Array","ubus_rpc_session":"String"}
        "changes":{"config":"String","ubus_rpc_session":"String"}
        "revert":{"config":"String","ubus_rpc_session":"String"}
        "commit":{"config":"String","ubus_rpc_session":"String"}
        "apply":{"rollback":"Boolean","timeout":"Integer","ubus_rpc_session":"String"}
        "confirm":{"ubus_rpc_session":"String"}
        "rollback":{"ubus_rpc_session":"String"}
        "reload_config":{}
OpenWrt provides a variety of ways to register UBUS services. An example of a counter is given here. The effect is as follows:
root@OpenWrt:~# ubus -v list counter
'counter' @18abaa64
        "get":{}
        "add":{"value":"Integer"}
root@OpenWrt:~# ubus call counter get
{
        "count": 0
}
root@OpenWrt:~# ubus call counter add '{"value": 10}'
{
        "count": 10
}
root@OpenWrt:~# ubus call counter get
{
        "count": 10
}
# Mode 1: Call the library provided by UBUS and write an executable program that runs independently.
C
#include <libubox/blobmsg_json.h>
#include <libubus.h>

static int count;

static int counter_get(struct ubus_context *ctx, struct ubus_object *obj,
		      struct ubus_request_data *req, const char *method,
		      struct blob_attr *msg)
{
	struct blob_buf b = {};

	blob_buf_init(&b, 0);

	blobmsg_add_u32(&b, "count", count);
	ubus_send_reply(ctx, req, b.head);
	blob_buf_free(&b);

	return 0;
}

enum {
	COUNTER_VALUE,
	__COUNTER_MAX
};

static const struct blobmsg_policy counter_policy[] = {
	[COUNTER_VALUE] = { .name = "value", .type = BLOBMSG_TYPE_INT32 },
};

static int counter_add(struct ubus_context *ctx, struct ubus_object *obj,
		      struct ubus_request_data *req, const char *method,
		      struct blob_attr *msg)
{
	struct blob_attr *tb[__COUNTER_MAX];
	struct blob_buf b = {};

	blobmsg_parse(counter_policy, __COUNTER_MAX, tb, blob_data(msg), blob_len(msg));

	if (!tb[COUNTER_VALUE])
		return UBUS_STATUS_INVALID_ARGUMENT;

	count = blobmsg_get_u32(tb[COUNTER_VALUE]);

	blob_buf_init(&b, 0);

	blobmsg_add_u32(&b, "count", count);
	ubus_send_reply(ctx, req, b.head);
	blob_buf_free(&b);

	return 0;
}

static const struct ubus_method counter_methods[] = {
	UBUS_METHOD_NOARG("get", counter_get),
	UBUS_METHOD("add", counter_add, counter_policy)
};

static struct ubus_object_type counter_object_type =
	UBUS_OBJECT_TYPE("counter", counter_methods);

static struct ubus_object counter_object = {
	.name = "counter",
	.type = &counter_object_type,
	.methods = counter_methods,
	.n_methods = ARRAY_SIZE(counter_methods),
};

int main(int argc, char **argv)
{
	struct ubus_context *ctx;

	uloop_init();

	ctx = ubus_connect(NULL);
	if (!ctx) {
		fprintf(stderr, "Failed to connect to ubus\n");
		return -1;
	}

	ubus_add_uloop(ctx);
	ubus_add_object(ctx, &counter_object);
	uloop_run();

	ubus_free(ctx);
	uloop_done();

	return 0;
}
Lua
#!/usr/bin/lua

local ubus = require "ubus"
local uloop = require "uloop"
local count = 0

uloop.init()

local conn = ubus.connect()
if not conn then
	error("Failed to connect to ubus")
end

local methods = {
	counter = {
		get = {
			function(req, msg)
				conn:reply(req, {count = count})
			end, {}
		},
		add = {
			function(req, msg)
				count = msg.value
				conn:reply(req, {count = count})
			end, {value = ubus.INT32 }
		}
	}
}

conn:add(methods)
uloop.run()
# Mode 2: Write rpcd (opens new window)plugin
Many times, we don't need to open a resident daemon for every UBUS service, so we can register our own UBUS service by adding plugins to rpcd.
Shell
#!/bin/sh
. /usr/share/libubox/jshn.sh

case "$1" in
	list)
		echo '{"get": { }, "add": {"value": 0}}'
	;;
	call)
		case "$2" in
			get)
				[ -f /tmp/counter ] || echo -n 0 > /tmp/counter
				count=$(cat /tmp/counter)
				echo "{ \"count\": $count }"
			;;
			add)
				read input
				json_load $input
				json_get_var add value

				[ -f /tmp/counter ] || echo -n 0 > /tmp/counter
				count=$(cat /tmp/counter)

				let count=count+$add
				echo -n $count > /tmp/counter

				echo "{ \"count\": $count }"
		esac
	;;
esac
Lua
#!/usr/bin/lua

local cjson = require("cjson")

local list = {
	get = {},
	add = {value = 0}
}

local function get_count()
	local count = 0
	local f = io.open("/tmp/counter", "r")
	if f  then
		count = f:read("*a")
		f:close()
	else
		os.execute("echo -n 0 > /tmp/counter")
	end
	return count
end

if arg[1] == "list" then
	print(cjson.encode(list))
elseif arg[1] == "call" then
	if arg[2] == "get" then
		local count = get_count()
		print(cjson.encode({count = count}))
	elseif arg[2] == "add" then
		local args = io.read("*a")
		args = cjson.decode(args)
		local count = get_count() + args.value
		os.execute(string.format("echo -n %d > /tmp/counter", count))
		print(cjson.encode({count = count}))
	end
end
# Access Data
We show the count value in the example from previous section through the web page and set it up through the web page.
Modify the Vue component added in the previous section:vuci/vuci-ui-core/src/src/views/test/sub.vue
<template>
  <div>
    <p>{{ count }}</p>
    <el-button type="primary" @click="add">+</el-button>
  </div>
</template>

<script>
export default {
  data() {
    return {
      count: ''
    }
  },
  created() {
    this.$ubus.call('counter', 'get').then(r => {
      this.count = r.count;
    });
  },
  methods: {
    add() {
      this.$ubus.call('counter', 'add', {value: 1}).then(r => {
        this.count = r.count;
      });
    }
  }
}
</script>
Now that our page is not working properly, we need to add permission for the counter UBUS service.
The permission profile storage path is:vuci/vuci-ui-core/files/usr/share/rpcd/acl.d。We can modify the existing permission profile or create a new one.
Let's create a new permission profile here:vuci/vuci-ui-core/files/usr/share/rpcd/acl.d/counter
{
  "counter": {
    "description": "Counter test",
    "read": {
      "ubus": {
        "counter": ["get"]
      }
    },
    "write": {
      "ubus": {
        "counter": ["add"]
      }
    }
  }
}
# Multilingual support
Language file storage path is:vuci/vuci-ui-core/src/src/locales。At present, only English and simplified
Chinese are supported. Add the content you need to translate to the corresponding language file.
Use in Vue template: $t('content')
<vuci-form-item-input :label="$t('Name')" name="name" required/>
Use in JS: this.$t('content')
← Compile